We live in amazing times for cameras and every month a new camera comes out. The influencers and marketers want you to believe the release is the best it’s ever been and you should probably buy it sooner rather than later.
This article exists to cut through the noise and help prepare a camera user to evaluate whether a camera actually fits their needs. Whether it be for your own small production company or a Hollywood movie here is a list of some of the factors to consider when evaluating a camera. It is then up to you to decide which factors are important.
Click on the arrow to expand the subject.
Dynamic range
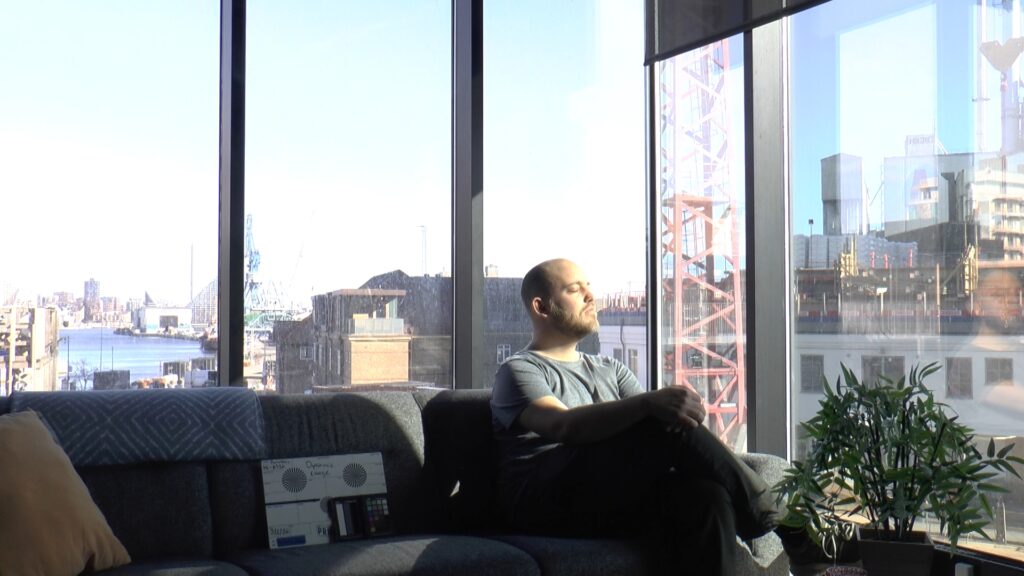
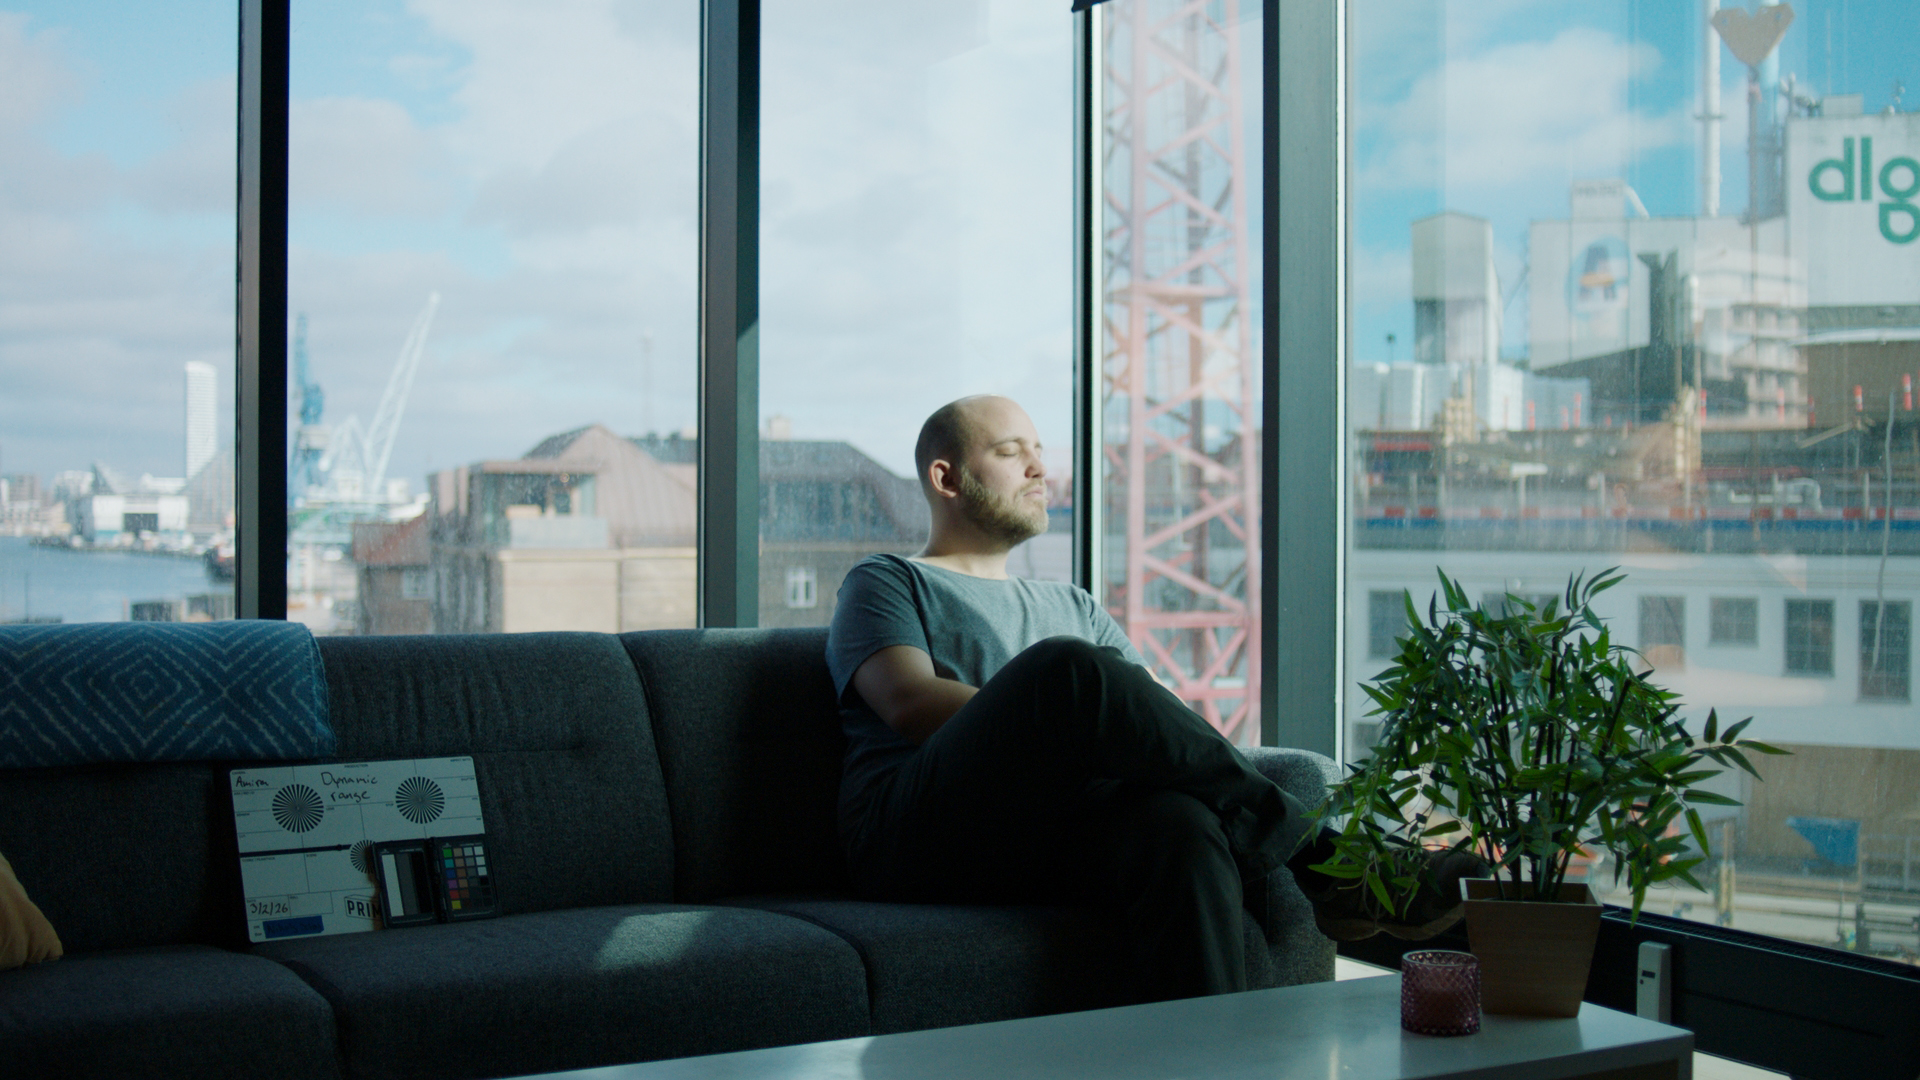
Dynamic range is the range of light a camera can capture from the darkest part of a scene to the brightest part of a scene without losing detail. Dynamic range is measured in stops and every stop of light represents a doubling of light (or half as much if going in the other direction.)
If the dynamic range of a camera is wide the camera will be better able to:
- retain information in shadows without being overwhelmed by noise or crushing information
- retain information in the highlights without clipping
- handle high-contrast scenes
Below is an exagerated example of varying dynamic range.
When is wide dynamic range useful?
A camera with wide dynamic range is often preferred in modern filmmaking as it allows for a more (traditionally) pleasing-looking or natural-looking image. This is because the dynamic range of the human eye is very wide. Many modern cameras perform really well with regard to dynamic range.
When shooting outdoor scenes where there may be limited control it is often desirable to have a high dynamic range because the scene often contains a very high difference in its brightest and darkest areas.
In a more controlled environment, dynamic range may be less critical because we can light the scene within the dynamic range of the camera. Nevertheless, wide dynamic range can still provide benefit to preserve bright practicals for example.
Exposure Latitude
The amount of exposure latitude a camera has concerns how much you can overexpose and underexpose a sensor and still recover the image back to “normal” exposure afterwards.
In practice it is how flexible the exposure of the camera is in color correction. To see different examples of latitude check out these latitude comparisons from CineD.
When is wide latitude good?
When going on a high-paced shoot where exposure control may be hard and the lighting or enviroment changes frequently wide exposure latitude can be very beneficial. If you get good at nailing exposure when you shoot, latitude is less of a factor. Go to our exposure references to learn more about Exposure Theory
Lens Mount
Does the lenses (and the accompanying lens mount) you want to use for a given project fit the camera? At the very least you need to be able to get the lens on the camera. If you are using a Canon C300 III with an Canon EF Mount you need a Canon EF lens.
Adapting lenses
Adapting lenses from one lens mount to another is possible, but only under ceartin circumstances and that is because of something called The flange focal distance. It is the distance between where the lens mounts and the imaging plane (the sensor). To be able to adapt a lens from one system to another, you need to be able to match this distance. Otherwise the focus won’t work at infinity.
The flange focal distance of a Sony E Mount lens is 18mm while the flange focal distance of a Canon EF mount lens is 44mm. That means you cannot put a Sony E mount lens on a Canon EF Mount because the distance from the mounting point of that specific lens to the imager (sensor) needs to be 18mm, and you would then have to stuff the lens inside the mount somehow. The Canon EF mount will be in the way and simply won’t permit correct function.
In turn what you can do to the Canon EF Mount lens is put an adapter on it. The adapter acts as a spacer adds the remaining 26mm (44mm – 18mm = 26mm) of distance from the lens to the imager (sensor).
In short: The key takeaway is that if a lens is designed for a longer flange focal distance than the system it is intended to go on, an adapter can be used.
There are other factors to considers with lens choices but seen from a camera perspective they relate to sensor size, which you can read about in the next section.
Sensor size
The sensor is one of the most important parts of the camera. After all it is the component converting light into an actual image. With that said the size of the sensor and the effect said size has on the image is a topic that has led to a lot of confusion over the years. We will quickly address this here.
Sensor sizes, angle of view and depth of field
What’s often talked about is the concept of a “large format look“. And while it is true that using a bigger camera sensor often influences the cinematographer to shoot in a way that creates a shallower depth of field, sensor size isn’t actually the defining factor of depth of field. You’ll also often hear people talk about how the sensor size changes the focal length of a lens. Let me be very clear: The sensor size DOES NOT change the focal length of a lens. A 50 mm is a 50 mm is a 50 mm regardless of what sensor is behind it.
Instead what actually changes is the angle of view of a given lens on different sensors. To maintain an equivalent framing from the same camera position the cinematographer must use a longer focal length on the larger sensor. At the same f-stop this results in a shallower depth of field.
As such it is actually the larger focal length and not the sensor that creates the shallower depth of field.
For a practical demonstration of this you can have a look at this excellent article by Cinematographer Manuel Luebbers.
Curios for more information on angle of view? Click here!
Unfortunately we haven’t written this part yet. Sign up for our newsletter when we release new stuff.
What sensor size also affects:
Lens selection
One of the big things is the lens selection you have available. As previously discussed the mount, flange distance and so forth of the lens needs to match, but the lens you are using also creates an image circle with a certain diameter. If that diameter is not big enough to cover your sensor you will experience heavy vignetting and loss of image.
(IMAGE)
It’s important to then be aware that some cameras allow the user to crop in on the sensor and in practice use smaller sensor size. This will in turn affect the amount of photosites used for the recording which sometimes affects image quality or resolution.
Low light
Another factor is that the low light performance of bigger sensors is often better. Meaning there will be less noise shooting in darker scenes. This is due to the fact that for the same resolution each photosite (the component counting photons hiting the sensor) on the sensor can be bigger, and thus can collect more light per photosite. There will always be some inherent sensor noise, but since a larger sensor collects more light per photosite the noise will be comparatively smaller compared to a smaller photosite. Thus resulting in an overall cleaner signal.
It is important to note though that if the sensor is big but also very high resolution this is not always true since you then have to cram in more photosites and they don’t get the added benefit of being bigger.
Curios for details on noise in sensors? Click here!
Sensor noise
Imagine a single photosite on a sensor for a moment. The way it works is the it detects how many photons hit in a ceartain time frame (the exposure time). Now imagine a monkey standing next to the sensor hitting it with a big stick 50 times everytime we grab an exposure. This monkey represents the sensor noise. Everytime the monkey hits the photosite we get more noise.
If a smaller sensor can collect 50 photons everytime we expose the image the signal-to-noise will be 1 to 1, since there is 50 noise and 50 photons. But if we then increase the size of the photosite and it therefore is able to collect 100 photons in the same amount of time you will not only have more light information but there will also be twice as many photons as there will be noise.
Photon shot noise
We also have another type of noise called photon shot noise. Due to the random nature of photons, three photosites next to each other will receive different amounts of photons even though they are shooting the same grey wall with the same lighting all across it. This means Photosite 1 may receive 90 photons, photosite two may receive 110 and photosite three may receive 100. The resulting difference will be expressed as a little amount of noise. As you increase the size of the photosites the variation will be bigger in absolute terms but smaller relative to the final amount of photons
If we take the three photosites again and 10x their size the photon shot noise rises less than the photons captured. So now it would look more like 970, 1000 and 1030 and thus there will be less noise compared to the final signal.
There are also other types of noise to consider like The key point both types of noise is that the noise rises more slowly than the signal as the photosites gets bigger.
Aspect ratio of the sensor
Another factor to consider is the aspect ratio itself of the sensor. If the camera has an open gate recording mode, it may be easier to create different crops of the same image, while still giving the ability to reframe for different deliverables.
(IMAGE)
The aspect ratio of the sensor also affects whether the sensor is a good fit for shooting anamorphic in some cases.
We are planning an article about shooting anamorphic and an article about angle of view. Click here to sign up to our newsletter and get notified when they get released.
Recording codecs
Coming soon
Maybe you even want the ability to shoot RAW? See the next section.
RAW capability
We could probably have put this under recording codecs, but we wanted to give it its own section since it is an important consideration for many people. If you want the ability to shoot RAW video you simply need to choose a camera with the ability to record or output RAW to an external recorder.
Shooting RAW video gives the user a file before it has been debayered and encoded. The main benefit of RAW is the added flexibility of adjusting settings like white balance and exposure in post-production with a higher degree of precision than if you shot in a more compressed format. With that said if the image is severely overexposed or washed in a red color on set and that wasn’t the intention, it will never be able to be balanced entirely, even shot in RAW.
Curious to what debayering is? Click here!
Unfortunately we haven’t written this part yet. Sign up for our newsletter when we release new stuff.
It is easy to fall into the allure of RAW and its promise of maximum quality. But remember the high data requirements, requiring more storage and more data processing power. It is definitely not worth it on every shoot. Many feature films have been shot entirely in ProRes. In fact shooting RAW can instead become a crutch. Instead of shooting with intent on the day, we risk thinking “let’s fix it in post”. In turn actually hurting the production in the end instead of helping it.
It’s also worth mentioning there is a big difference in the RAW offererings between camera manufactures. Most of the RAW formats are actually also compressed.
Frame rates
Coming soon
ISO and noise performance
Coming soon
Rolling Shutter
Coming soon
Ergonomics
Weight, size and form factor are all important considerations when choosing a camera. Depending on the production circumstances, these factors may have a big impact on the production. If the shoot relies heavily on a gimbal, it may be important that the camera not be too big or heavy. If the shoot is in a studio on sticks (tripod) the entire day, the size of the camera may not be a problem. Maybe the entire film is set inside a car and rigging a big camera in the many different framings in the car simply isn’t feasible. Maybe everything is handheld and the camera can’t be too small and lightweight as it may cause micro jitters or the camera can’t be too big as the operator won’t be able to last the entire day.
Physical workflow features
Workflow features are a broad category that covers features that may not directly impact the final image, but support the creation of it somehow. There are many such features and the importance of these varies by the workflow of the shooter. Below is a short list of some of them and a short description of their function. It isn’t always a deal-breaker for a camera if it doesn’t have some of these features as they can be supplemented by a good external monitor.
Usability of the built in screen:
Many cameras have a built in screen, but the usability of it often varies wildly. For a screen used to monitor there are 3 main factors.
- Is it big enough for you to be able to check your framing.
- Is it bright enough for you to see the image.
- Is it color accurate.
Not many internal camera screens hit all 3 at the same time, and many shooters use an external monitor.
Personally I absolutely adore my external monitor. I bring it on every shoot and use it on any camera and I know exactly how it displays light and color. I newer go on a shoot without it.
HDMI & SDI ports:
If the shoot needs any sort of external video feed (it often does), it’s important to consider what port the camera has to output that image. And even how many of them there are on the camera. There are two options: HDMI or SDI.
HDMI can be very good, but for very demanding productions, SDI ports are often preferred. This is because they have locking connectors and they support more reliable and longer cable runs. They are also widely supported by professional monitoring solutions. This makes them more suitable for when you have a 1st AC pulling focus.
HDMI comes in several sizes. Full size HDMI is preferred as the smaller ones have a tendency to break.
Micro HDMI is a crime against humanity. It will break when you need it.
Genlock:
A genlock port is used to synchronize the camera with external equipment e.g., a virtual production LED wall to help mitigate flicker.
Timecode
A timecode port is used for timecode synchronization, making it easier to sync externally recorded sound or cameras in post-production.
Internal ND:
An internal Neutral Density (ND) filter is built in to some camera. It’s an ND filter directly in the camera between the lens and the sensor. This can be very handy as it is a very easy and fast to use tool and often of very high quality. Some companies even offer Internal variable ND which add the ability to very precisely adjust exposure.
I love internal ND and value it very highly in a camera. For my own work it is a high priority as it allows me to work work with my exposure.
Buttons:
Customizable physical buttons on the camera allow you to design the workflow specifically for your needs.
Monitoring features
False Color:
A false color tool is a powerful exposure tool that generally works by overlaying pixels of a certain brightness value with a color. For example overlaying overexposed pixels with red, indicating very clearly that the image is overexposed.
Manufacturers implement false color in a range of different ways. It is often based on converting the image signal to an IRE signal that goes from 0 – 100%. Where 0 generally is no light and 100 is full brightness. Bright colors are then added to the image based on where the individual pixels fall on the IRE scale. A pixel that is 43% bright may for example be colored green because it lands on the middle grey of the gamma and a pixel 53% brightness may be colored pink. This way no matter how the user’s eyes adjust, the user will always be able to see when a certain pixel is at a specific exposure point. This could be the subject’s skin or something similar. The user may decide that they want to expose the skin a little higher than middle grey. They could then always set the exposure of the camera so the skin is green in the false color and then let in a little more light, by for example opening up the aperture or by adding light to the face.
Often false color is not supported by the camera and the user would then use it through an external monitor. In this case it is important to note that the user needs to be aware of what signal the false color expects. Log, rec709 or linear light. If the signal path isn’t correct the data shown will be inaccurate or wrong.
I love working with false color tools. Working with false color enables you to start working with contrast ratios. Understanding contrast ratios enables you to very clearly define your intended look and work consistently with it on set. In my opinion, the conventional implementation of false color through IRE lacks precision, so I’ve actually developed a way to work precisely with contrast ratios on any monitor that supports LUTs. If you want to be able to do very accurate work with contrast ratios, you can read more here.
Waveform and scopes:
Waveform and scopes offer a data-driven way to evaluate your image. Human vision adjusts to the surroundings as such our own vision sometimes becomes unreliable. Waveform and scopes, on the other hand, can provide a very repeatable set of measurements of the image-signal coming in. It is however important to be aware that the scope readings will change depending on whether the image coming in is log or another output that is processed e.g. through a LUT or otherwise display-referred.
Internal LUT support:
It’s generally not advisable to monitor the image through the log signal. Watching the log image risks the shooter missing important nuances in the contrast and exposure of the image. As such it should be converted. This could be by a LUT. If you’ve built a special look with a LUT it can be handy to have this functionality built-in to the camera.
Aspect ratio cropping or frame lines:
When delivering a film in an aspect ratio that is not natively supported in the recording options, the sensor records a larger image than is needed. In this case it is very useful to have the ability to preview specific aspect ratios or frame lines. These frame lines will then help the crew monitor the image in its intended delivery format.
De-squeeze:
De-squeeze is an important tool if you want to use anamorphic lenses. If the camera doesn’t support de-squeeze and an external monitor with this functionality isn’t available, it often isn’t feasible to shoot anamorphic. Due to the design of anamorphic lenses, the light coming through and hitting the sensor is squeezed horizontally and the image will look distorted and monitoring won’t work well. Judging composition and focus becomes significantly harder. Anamorphic lenses come in different squeeze factors (1.3x, 1.5x 2.0x, and so forth), so having more squeeze options opens up the possibilities for more lenses.
Auto focus performance
If the camera supports Auto Focus it will be able to focus automatically for you on supported lenses. Auto focus comes in many different qualities, so if it is important for you with an auto focus camera I would examine if the specific auto focus features can handle your needs.
Most high-end productions don’t care about auto focus performance because a big part of the 1st AC’s job is dedicated to making sure the focus is where it needs to be. But if you are working on smaller productions auto focus performance can be very important.
Resolution
More is not always better. The same is true for resolution in cameras. As mentioned in the section on sensor size there can be advantages to not having a camera capable of shooting the highest amount of resolution.
High resolution is often an advantage for VFX work and reframing in post-production. Other advantages and disadvantages also show themselves. Some cinematographers prefer to have the ability to reframe in post while other want to protect and nail the work done on set. Sometimes things move fast and the ability to reframe the image comes in handy.
Disadvantages of high resolution is increased storage requirements, higher data processing requirements and often the higher resolution a sensor has the more rolling shutter it also has.
Generally going for higher resolution just because it “looks better” is an uninformed choice. For a great demo on the importance (or lack thereof) of resolution, see this demo by Steve Yedlin.
Moiré handling
Coming Soon
Leave a Reply